

Decorating Glow in the Dark Magnetic Pumpkins for Halloween
By Blog Editor Susan Wells
I’ve carved pumpkins every Halloween with my children for years. Confession – I really hate it.
1. The pumpkin guts sting my hands.
2. It’s hard to scrape and clean it out.
3. It makes a big gloopy mess without a lot of fun.
4. My girls have a hard time actually carving and I end up doing it. Alone. While they shout from the next room, “are you done yet?”
This year I decided to break with tradition and not carve pumpkins. So I began looking for crafty ideas that included a little science and a void of pumpkin innards.
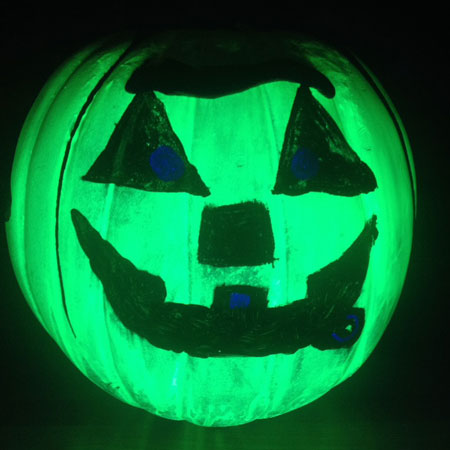
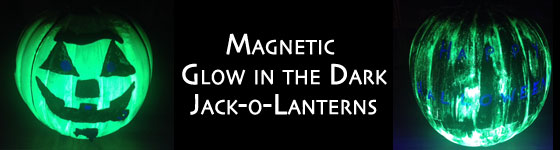
Look closely to see the dark blue glow in the eyes – the invisible pen creates this effect.
Glow in the Dark Magnetic Jack-o-Lanterns
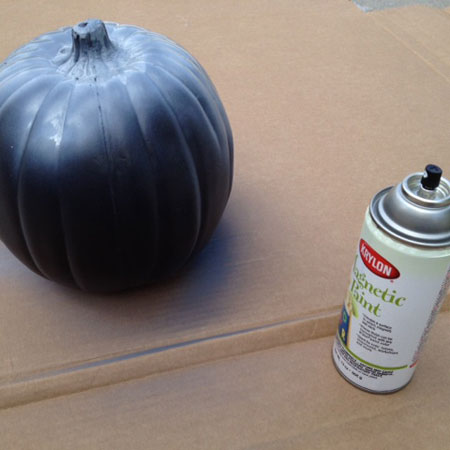
I ended up adding a Magnetic Paint with a little Zinc Sulfide and a lot of creativity.
Materials
Set-Up Time Project Time Project Location
|
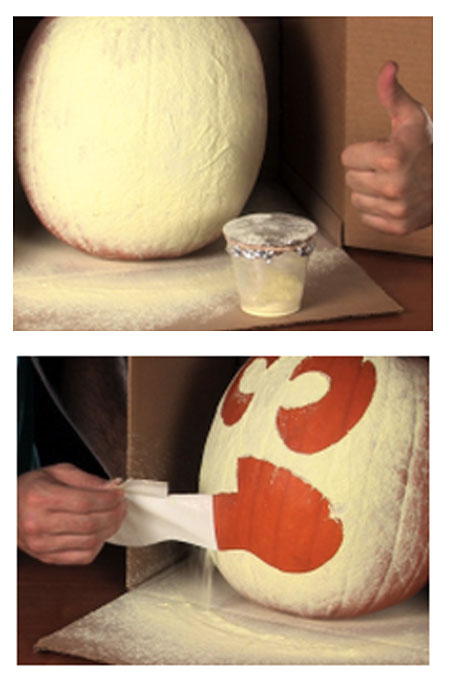
Magnetic Pumpkin
- Lay newspaper or cardboard to protect surface.
- Wipe dirt or dust off pumpkin so paint will stick.
- Cover pumpkin with magnetic paint. This may take several coats to build up the magnetism.
- Test with a magnet when dry. Add layers of magnetic paint until magnets hold on the sides.
Colored Pumpkins
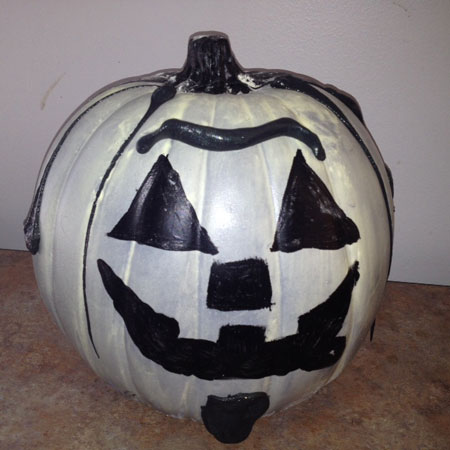
- We decided to paint one half of the pumpkin. On the backside, we painted over the magnetic paint with black acrylic chalkboard paint.
- Before the paint was dry, we lightly sprinkled some glow powder for a special effect.
- While the paint was drying, we began work on our face…
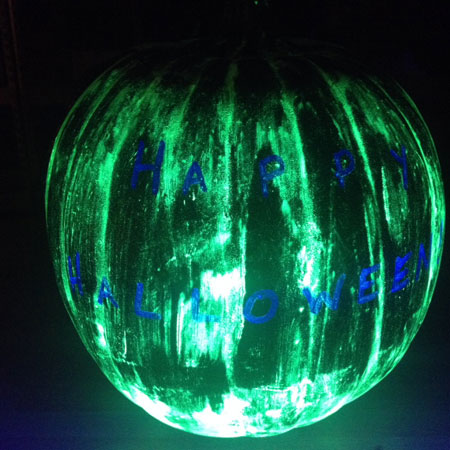
The blue glowing letters are written in Invisible Pen. They only show up under a Black Light.
Glow in the Dark Pumpkin
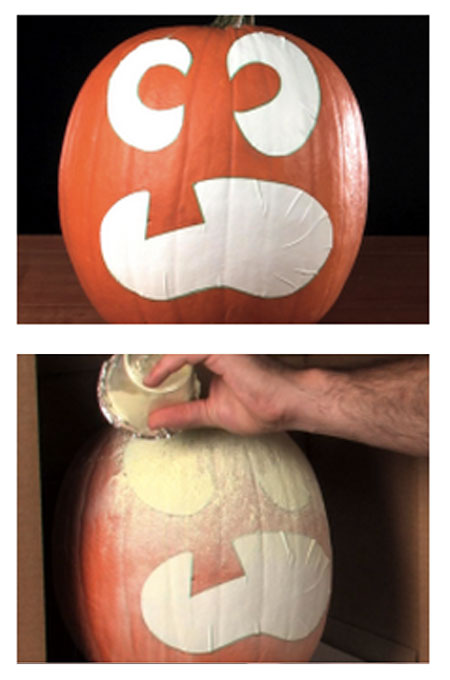
- Draw the face pieces on the contact paper and cut each piece out. Peel the pieces off the paper backing and arrange them as a face for your pumpkin.
- Once your jack-o-lantern face is complete, take your pumpkin outside and place it on the drop cloth.
- Spray sections of the pumpkin with the spray adhesive, immediately following with the Glow Powder. For best results, hold the adhesive 10-14 cm (4-6 in) away from the pumpkin and spray a heavy coat. When sprinkling the powder, you may also want to tilt your pumpkin to get it evenly covered.
- Pour the Glow Powder from its jar into an empty salt shaker. This will make it much easier to sprinkle the powder onto your pumpkin.
Alternately, you can pour the Glow Powder into an empty portion cup. Cover the top of he portion cup with aluminum foil and hold it in place with a rubber band. Use a thump tack to poke holes in the tin foil… just like a salt shaker!
- Continue spraying and powdering each section of the pumpkin until the entire pumpkin is completely covered with powder. Carefully shake off any excess powder as you go.
- Collect the excess Glow Powder and pour it back into the shaker.
- Repeat steps four and five to ensure that your pumpkin is evenly and completely covered with powder.
- After the adhesive is completely dry, spray the entire pumpkin with the sealant to make sure that the Glow Powder stays affixed to the pumpkin.
- After the pumpkin is dry, carefully pull the contact paper off of the pumpkin.
Final Decorating with Secret Messages
- Using the Invisible Ink Pen, write a secret message on the non-face side. If you used chalkboard paint, you can also decorate with colored chalk.
- Using the Magnetic Putty, we changed up the look by adding a uni-brow, a goatee and stringy hair.
- For the final act, place the pumpkin next to a black light to read your secret messages and see a different side of your jack-0-lantern.
The Science Behind
Learning about the science of things that glow requires an understanding of two important terms – fluorescence and phosphorescence. It’s also important to note that not all zinc sulfide glows, but luminous zinc sulfide does glow!
Fluorescence – This type of luminescence occurs when some form of radiation, such as light, causes an object to glow. For example, fluorescent papers and poster boards glow in the daylight. They may seem to glow even brighter under black light (ultraviolet), but in either case, as soon as the light is removed, the glow stops. Fluorescent things do not glow in the dark all by themselves – they require some other form of energy such as ultraviolet light to “excite” them.
Phosphorescence – Phosphorescence is just like fluorescence, except that the glow continues even after the light used to excite it is removed. “Glow in the dark” toys phosphoresce brightly in total darkness after being “charged” or excited by ordinary white or ultraviolet light.
Glow Powder works by absorbing surrounding light energy and then releasing that energy when the lights go out. It’s called a phosphorescent powder. It’s the perfect way to get your students excited about energy… and a great way to celebrate Halloween! Just add glow powder to almost any of our favorite products and you’ll have an eerie new take on your favorite experiments!
So, how does zinc sulfide work? Imagine that an atom looks something like our solar system. The sun would be the nucleus consisting of positive charges called protons and neutral charges called neutrons. The planets spinning around the sun would be similar to the electrons of an atom in orbits around the nucleus.
When the electrons in the atoms of special molecules like zinc sulfide become excited, they move farther away from the nucleus — into higher or more distant orbits. In order to become excited, the electrons must take on energy. In this case, light provided the required energy to cause the electrons to move to a higher energy level. It’s as if Earth were to move farther away from the sun into the orbit of Mars or Jupiter.
The electrons will remain in the excited state as long as they receive light to energize them. But, when the light used as an exciter is removed, the electrons will slowly return to their original lower orbits. As they do so, they give up the energy that excited them in the form of light.
Thanks to Smashed Peas and Carrots for the original idea.

Trackbacks & Pingbacks
[…] magnetic pumpkin involves magnetic paint being sprayed in multiple layers on the pumpkin. After the paint has set, […]
Leave a Reply
Want to join the discussion?Feel free to contribute!